Android Vector Drawable Example using AppCompat Support Library
With the Arrival of the new version of the Android Support Library AppCompat v23.2 , it comes up with backward compatibility of some features and add some new features also. With the release of Android lollipop (API 21) a new component was included named Vector Drawable. But this component only works on API 21+, with the arrival of Android Support Library AppCompat v23.2 Vector Drawable now provides great backward compatibility to Drawable Images for API 7+ device .
What is Vector Drawable ?
As the name implies, vector drawables are based on vector graphics, as opposed to raster graphics. , vector graphics are a way of describing graphical elements using geometric shapes. It is similar to SVG file. In Android Vector Drawable are created with XML files. Before the Addition of Vector Drawable in Android SDK, developer had to create multiple version of images for different display resolutions . This take more time to create extra assets and consume more space that increases the Apk size.
Now there is no need to design different size image for mdpi, hdpi,xhdpi and etc. With Vector Drawable you need to create image only once as an xml file and you can scale it for all dpi and for different devices. This also not save space but also simplifies maintenance.
Let’s Get it Working
In this tutorials we will learn how to create Vector Drawable. To really understand the usage of Vector Drawable we will create an app. The App will show the usage of Vector Drawable. I assume that you have created a new android project.


Step 1 ) Update build.gradle file
Before you can use Vector Drawable in your projects you need to add the following compile line to your Gradle dependencies block in your build.gradle file and rebuilt the project .
dependencies {
    ...
   compile 'com.android.support:appcompat-v7:23.2.1'
}
If you are using v2.0 or above of the Gradle plugin, then add following code
// Gradle Plugin 2.0+
 android {
   defaultConfig {
     vectorDrawables.useSupportLibrary = true
    }
 }
If you are using v1.5 or bellow of the Gradle plugin, then add following code
// Gradle Plugin 1.5
 android {
   defaultConfig {
     generatedDensities = []
  }

  // This is handled for you by the 2.0+ Gradle Plugin
  aaptOptions {
    additionalParameters "--no-version-vectors"
  }
 }
Step 2 ) Creating Vector Drawable
Here we create vector drawable by using Vector Asset Studio Tool that is inbuilt tool in Android Studio.
1) Right Click on drawable folder > New > Vector Assets
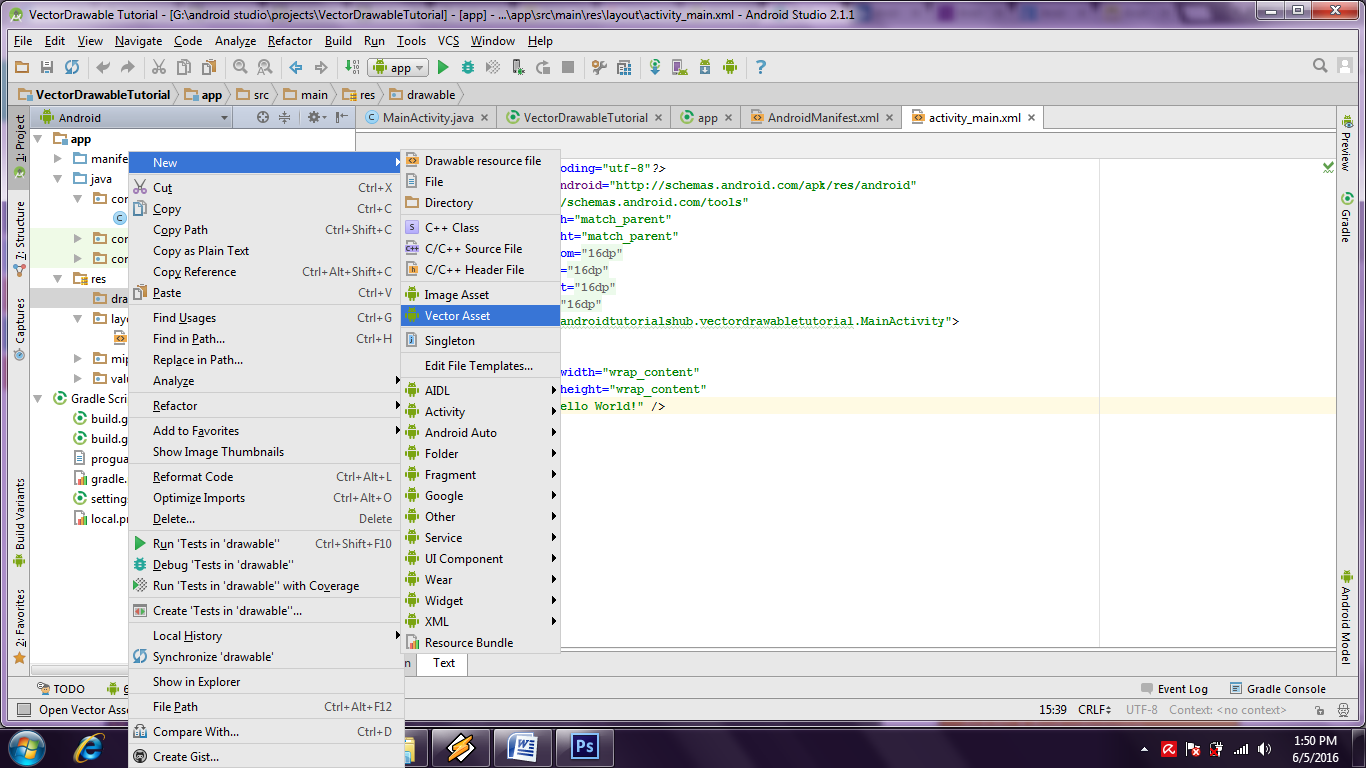
Vector Asset
2) Now Vector Asset Studio Tool window is prompted.
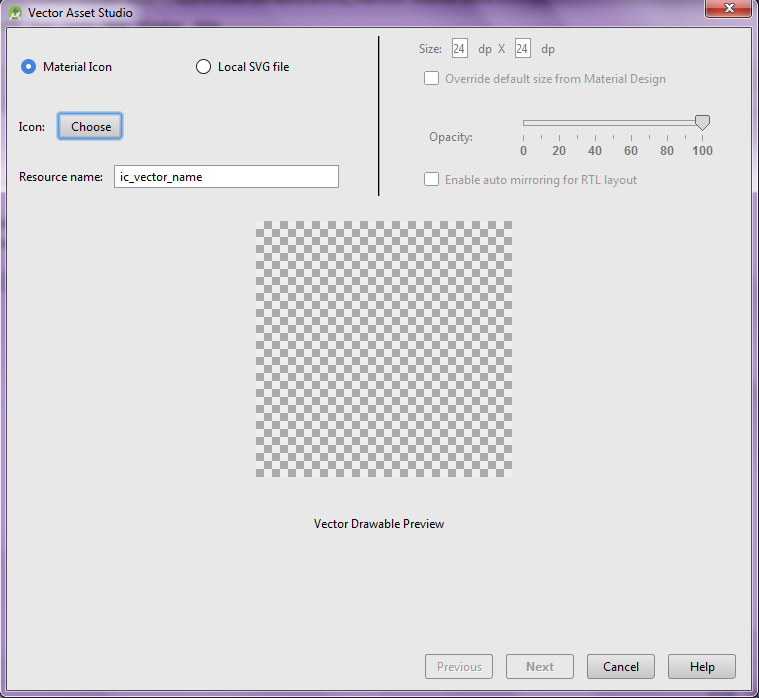
Vector Asset Studio
3) Creating vector drawable xml from default Material icon or Local SVG File.
Option 1) Material icon
Choose Material Icon option and then click on Choose button against the Icon option. It will prompt the Select Icon window here you can choose any icon you want to. I here chosen the man with bicycle icon and click Ok.
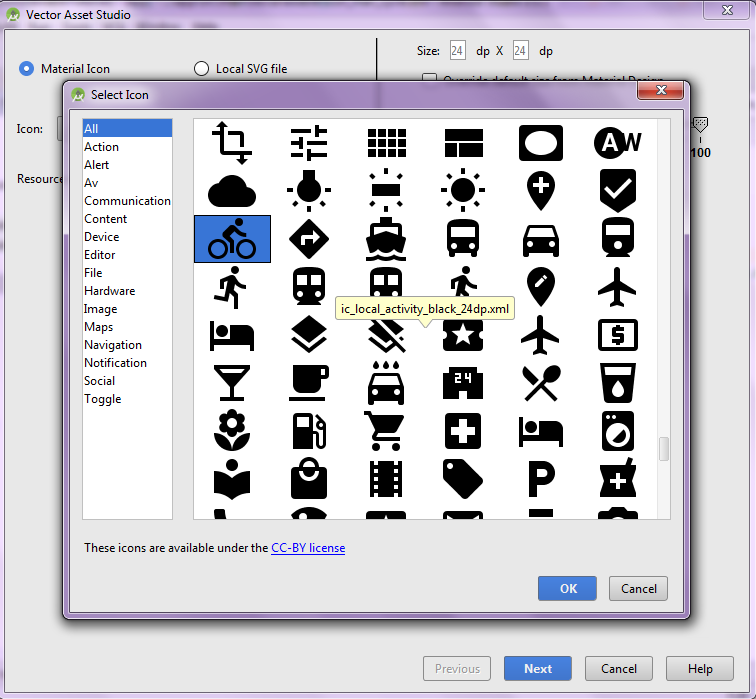
Select Icon Window
This window shows the preview of the icon that is chosen. I have also set the size 64dp X 64dp. Now click on Next.
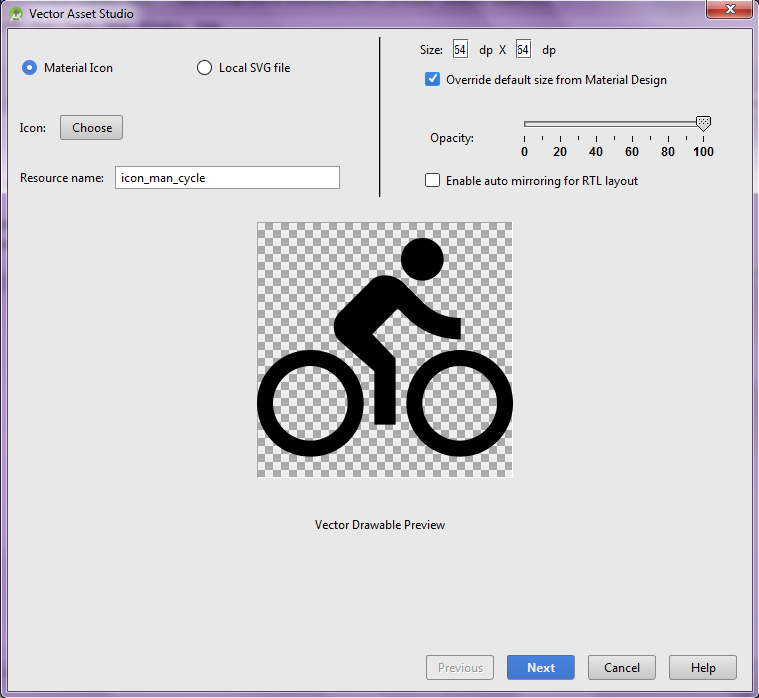
Vector Drawable Preview
Here this window allows to set the Target Module and Res Directory(Either release or debug mode). After configuration click finish.

Icon output window
Below is the result of the above process. It will generate the vector drawable icon_man_cycle.xml in drawable folder.
<vector xmlns:android="http://schemas.android.com/apk/res/android"
    android:width="64dp"
    android:height="64dp"
    android:viewportHeight="24.0"
    android:viewportWidth="24.0">
    <path
        android:fillColor="#f9b840"
        android:pathData="M15.5,5.5c1.1,0 2,-0.9 2,-2s-0.9,-2 -2,-2 -2,0.9
        -2,2 0.9,2 2,2zM5,12c-2.8,0 -5,2.2 -5,5s2.2,5 5,5 5,-2.2 5,-5 -2.2,
        -5 -5,-5zM5,20.5c-1.9,0 -3.5,-1.6 -3.5,-3.5s1.6,-3.5 3.5,-3.5 3.5,
        1.6 3.5,3.5 -1.6,3.5 -3.5,3.5zM10.8,10.5l2.4,-2.4 0.8,0.8c1.3,1.3
        3,2.1 5.1,2.1L19.1,9c-1.5,0 -2.7,-0.6 -3.6,-1.5l-1.9,-1.9c-0.5,-0.4
        -1,-0.6 -1.6,-0.6s-1.1,0.2 -1.4,0.6L7.8,8.4c-0.4,0.4 -0.6,0.9 -0.6,
        1.4 0,0.6 0.2,1.1 0.6,1.4L11,14v5h2v-6.2l-2.2,-2.3zM19,12c-2.8,0 -5,
        2.2 -5,5s2.2,5 5,5 5,-2.2 5,-5 -2.2,-5 -5,-5zM19,20.5c-1.9,0 -3.5,-1.6
         -3.5,-3.5s1.6,-3.5 3.5,-3.5 3.5,1.6 3.5,3.5 -1.6,3.5 -3.5,3.5z" />
</vector>
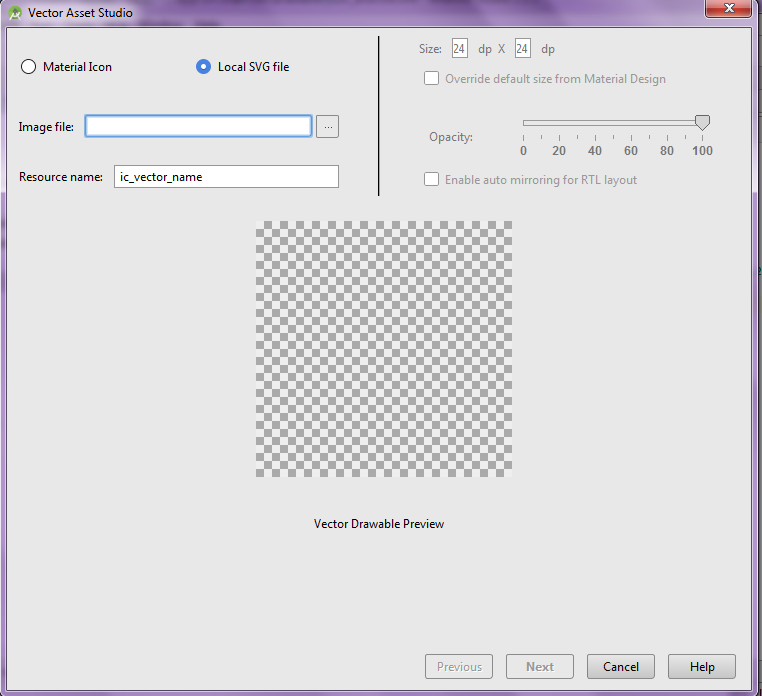
Option 2) Local SVG File
You can also create Vector Drawable image from Local SVG File. Choose Local SVG File option and then select the local file path.
Vector Asset Studio
This window shows the preview of the icon that is chosen from Local file path. I have also set the size 64dp X 64dp. Now click on Next.

Vector Drawable Preview
Here this window allows to set the Target Module and Res Directory(Either release or debug mode). After configuration click finish.
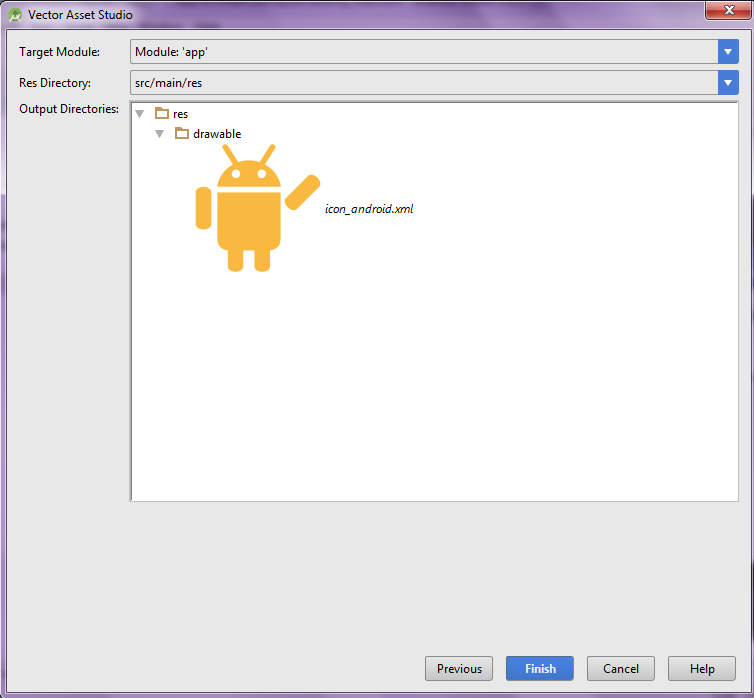
Icon Output Window
Below is the result of the above process. It will generate the vector drawable icon_android.xml in drawable folder.
<vector xmlns:android="http://schemas.android.com/apk/res/android"
    android:width="24dp"
    android:height="24dp"
    android:viewportHeight="24.0"
    android:viewportWidth="24.0">
    <path
        android:fillColor="#f9b840"
        android:pathData="M13.281,3.82c0.016,-0.019 0.04,-0.027
        0.053,-0.049l1.878,-2.975c0.151,-0.238 0.062,-0.545 -0.2
        ,-0.684c-0.26,-0.137 -0.594,-0.057 -0.745,0.184l-1.877,
        2.975c-0.026,0.042 -0.037,0.088 -0.049,0.133c-0.635,-0.219
         -1.315,-0.347 -2.028,-0.347c-0.721,0 -1.409,0.129 -2.05,
         0.352C8.25,3.362 8.24,3.315 8.211,3.271L6.333,0.297c-0.15
         ,-0.24 -0.484,-0.32 -0.744,-0.184c-0.262,0.139 -0.352,0.445
          -0.2,0.684l1.877,2.975c0.015,0.023 0.042,0.035 0.062,0.056
          c-1.578,0.866 -2.718,2.388 -3,4.188h11.967C16.011,6.21 14.865
          ,4.686 13.281,3.82zM7.87,6.384c-0.439,0 -0.795,-0.355 -0.795,
          -0.795S7.43,4.794 7.87,4.794c0.438,0 0.794,0.355 0.794,0.795S8.308,
          6.384 7.87,6.384zM12.697,6.384c-0.439,0 -0.795,-0.355 -0.795,-0.795
          s0.355,-0.795 0.795,-0.795c0.438,0 0.794,0.355 0.794,0.795S13.135,
          6.384 12.697,6.384zM1.781,8.037c-0.808,0 -1.465,0.441 -1.465,0.987v6.003c0
          ,0.546 0.657,0.988 1.465,0.988c0.811,0 1.469,-0.442 1.469,-0.988V9.024C3.25
          ,8.479 2.591,8.037 1.781,8.037zM4.37,17.484c0,1.545 0.618,2.305 1.967,2.445v3.057c0
          ,0.533 0.653,0.967 1.456,0.967S9.25,23.52 9.25,22.986v-3.025c0.684,0.002 1.4,0.004
          2.087,0.006v3.02c0,0.533 0.653,0.967 1.456,0.967s1.457,-0.434 1.457,-0.967v-3.048c1.383
          ,-0.149 1.996,-0.983 1.996,-2.423c0,-1.594 0,-8.438 0,-8.438H4.382C4.382,9.078 4.37,
          15.767 4.37,17.484zM23.132,6.301c-0.568,-0.568 -1.335,-0.724 -1.713,-0.346l-4.186,
          4.186c-0.377,0.377 -0.222,1.146 0.346,1.713c0.567,0.567 1.337,0.724 1.714,0.347l4.186
          ,-4.186C23.856,7.637 23.699,6.869 23.132,6.301z" />
</vector>
Step 3) Update strings.xml.
Add the below string values to the string.xml located in res => values => strings.xml.
<resources>
    <string name="app_name">VectorDrawable Tutorial</string>
    <string name="material_icon">Material Icon</string>
    <string name="svg_file_icon">Local SVG File Icon</string>
    <string name="dynamic_icon">Vector Image Pragmatically</string>
</resources>
Step 4) Update activity_main.xml.
Open the layout file for the MainActivity.java i.e activity_main.xml and add the below code in your layout file . The code will create three TextView and three ImageView to show the usage of Vector Drawable. Please note that i have used app:srcCompat instead of android:src to set drawable to ImageView. From three ImageView two of them are assigned images from drawable folder using app:srcCompat and one of the ImageView is assigned image progmatically.
<?xml version="1.0" encoding="utf-8"?>
<LinearLayout xmlns:android="http://schemas.android.com/apk/res/android"
    xmlns:app="http://schemas.android.com/apk/res-auto"
    xmlns:tools="http://schemas.android.com/tools"
    android:layout_width="match_parent"
    android:layout_height="match_parent"
    android:gravity="center_horizontal"
    android:orientation="vertical"
    android:paddingBottom="@dimen/activity_vertical_margin"
    android:paddingLeft="@dimen/activity_horizontal_margin"
    android:paddingRight="@dimen/activity_horizontal_margin"
    android:paddingTop="@dimen/activity_vertical_margin"
    tools:context="com.androidtutorialshub.vectordrawabletutorial.MainActivity">

    <TextView
        android:layout_width="wrap_content"
        android:layout_height="wrap_content"
        android:layout_marginTop="20dp"
        android:text="@string/material_icon"
        android:textColor="@android:color/black"
        android:textSize="25sp" />

    <ImageView
        android:layout_width="wrap_content"
        android:layout_height="wrap_content"
        app:srcCompat="@drawable/icon_man_cycle" />

    <TextView
        android:layout_width="wrap_content"
        android:layout_height="wrap_content"
        android:layout_marginTop="20dp"
        android:text="@string/svg_file_icon"
        android:textColor="@android:color/black"
        android:textSize="25sp" />

    <ImageView
        android:layout_width="wrap_content"
        android:layout_height="wrap_content"
        app:srcCompat="@drawable/icon_android" />

    <TextView
        android:layout_width="wrap_content"
        android:layout_height="wrap_content"
        android:layout_marginTop="20dp"
        android:text="@string/dynamic_icon"
        android:textColor="@android:color/black"
        android:textSize="25sp" />

    <ImageView
        android:id="@+id/imagePragmatically"
        android:layout_width="wrap_content"
        android:layout_height="wrap_content"
         />

</LinearLayout>
Step 5) Update MainActivity Class.
Now Open MainActivity.java and make some changes in code . Here i created object of image view and set Vector Drawable Programatically to ImageView by using setImageResource();
package com.androidtutorialshub.vectordrawabletutorial;


import android.os.Bundle;
import android.support.v7.app.AppCompatActivity;
import android.widget.ImageView;

public class MainActivity extends AppCompatActivity {

    private ImageView imagePragmatically;

    @Override
    protected void onCreate(Bundle savedInstanceState) {
        super.onCreate(savedInstanceState);
        setContentView(R.layout.activity_main);

        //initialize object of imageview
        imagePragmatically = (ImageView) findViewById(R.id.imagePragmatically);

        //set vector drawable progmatically to ImageView
        imagePragmatically.setImageResource(R.drawable.icon_android);
    }
}
The above code would result a screen like this:
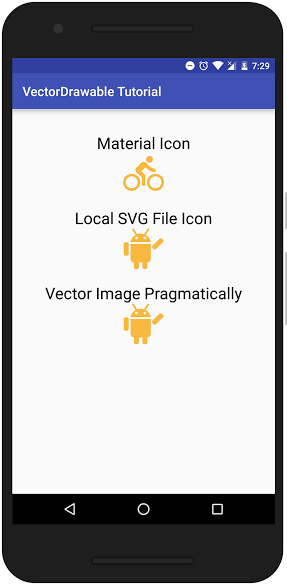
Vector Drawable Show Case
Enjoy Coding and Share Knowledge